 |
 |
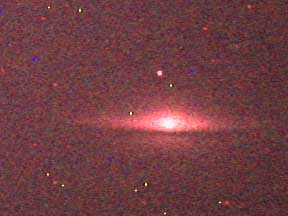
| single original frame | stack of 9 frames (factor of 3 signal to noise ratio improvement over a single frame) after level adjustment |
The following images show an example of what can be accomplished by stacking deep sky images. This example was made from the exact set of images available in the Tutorial Images folder of the documentation, so you should be able to replicate or improve on the results yourself. If the raw images were not compressed highly or the stack consisted of more frames, the results would be even more impressive. You can see a much better version of this stack on my website which uses uncompressed raw frames and many more raw frames than those provided here.:
|
|
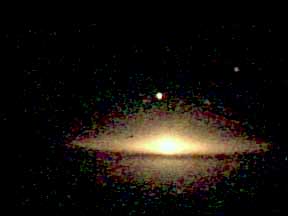
| single original frame | stack of 9 frames (factor of 3 signal to noise ratio improvement over a single frame) after level adjustment |
Many of the steps in processing deep sky images are similar to processing planetary images. Rather than repeat the same information, I will make reference to the planetary imaging documentation in the relevant places.
The following is a list of the necessary steps for processing deep sky images. I will go through each one in order, from start to completion:
Bringing individual frames into the stack is performed exactly as in planetary processing.
It will be necessary to deBayer the frames if the images came from a RAW modded camera that transfers the Bayer matrix to the computer. This is performed exactly as in planetary processing.
Although I list this is an optional step, it is practically required for any decent deep sky image processing.
CCDs accumulate several kinds of noise over the duration of a long exposure. The worst offenders are thermal noise, hot pixels, and amp glow.
Thermal noise is a steady influx of noise that results from the ambient temperature of the CCD and its nearby circuitry. This produces a smooth swathe of buildup in the pixel values evenly across the entire image. Although the rate of thermal noise accumulation can be slowed by keeping the CCD as cool as possible, there is always some degree of thermal noise buildup.
Hot pixels are physical defects in the CCD where specific pixels fully saturate very quickly, usually in a matter of seconds. Hot pixels look like bright speckles of various colors that have been peppered across the image. They always appear in exactly the same place on all images, since they are physically present in the CCD sensor itself.
Amp glow is the result of the webcam circuitry which attempts to boost the image signal before sending it across the USB cable to the computer. The amplifier is located on one side of the CCD and causes a gradient of value accumulation that builds up unevenly across the image.
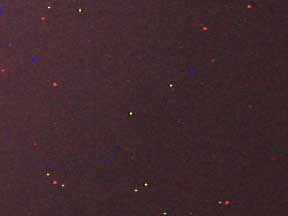
Here is an example of a dark frame:
All of these defects are easily dealt with by subtracting a dark frame from the individual frames prior to stacking them. A dark frame is a frame which received no light and represents an exposure time equal to the actual frames themselves. The dark frame represents all the value in an image of a given duration that did not actually result from real light hitting the CCD. By subtracting this value out, the frames are left only with real information about light that hit the CCD.
To open a dark frame image simply choose the appropriate menu command under the File menu. Bare in mind that the dark frame must be the same dimension as the individual frames. It is also important not the crop the frames before opening a dark frame. Open the dark frame first. Then you can crop the frames and the dark frame will be cropped as well.
Once a dark frame has been opened, you can subtract it from an individual frame by control-clicking on the frame's clip in the Clips Window. Alternatively, you can select any number of frames and control-click on any selected frame to subtract the dark frame from all of the selected frames at once. You can always undo a frame's dark frame subtraction by control-clicking on its clip again.
Any frame that has been dark frame subtracted will have its clip marked with a 'D' in the upper right corner of the clip.
Hint: It is a good idea to take several dark frames and stack them, producing an average dark frame before processing your actual images. Using the average dark frame image as the dark frame for your actual images will produce more accurate results in your final image.
While this is certainly an optional step, and you can definitely get good results without it, if your imaging system is producing uneven light sensativity across the CCD, your results will improve dramatically if you start using flat field division.
CCDs are often unevenly sensative to light across their entire surface. In addition, the optics of a telescope projecting an image onto a CCD can produce an uneven light sensativity across the CCD. This problem is dealt with using a flat field.
A flat field is an image of a diffuse light source, thereby capturing the light sensativity patterns present across the CCD for a given optical setup. Flat fields are usually acquired by capturing a picture of a twilight sky.
Here is an example of a flat field (although in there case there is only a minor degree of uneven light sensativity across the image):

Once a flat field image has been acquired, it can be divided out of the individual frames after dark frame subtraction and before stacking.
To open a flat field image simply choose the appropriate menu command under the File menu. The same issues that applied to the dark frame apply to the flat field, so don't crop the frames until after opening a flat field frame, if you intend to use a flat field at all.
To divide a flat field from a single frame control-shift-click on the frame's clip, or make a selection of clips and control-shift-click on any selected frame. You can always undo a frame's flat field division by control-shift-clicking on its clip again.
Any frame that has been flat field divided will have its clip marked with an 'F' in the upper right corner of the clip.
This doesn't serve much purpose when processing dark sky images, but if you find it useful, it can be done. The process is described in the section on planetary processing.
Aligning dark sky images is essentially identical to aligning planetary images. The only difference is deciding what sort of feature to define a rectangle around. I generally align dark sky images in two stages. I first define a rectangle around the main object, say the core of a galaxy or nebula, and do a '1' translational alignment on it. After that, I define a very small rectangle around a sharp feature like a star and do a '3' translational alignment. If no stars are present in the image, then clearly it is impossible to do the second step.
Don't forget to rotationally align your images as well. Long exposure photography, and long duration photography in which imags are captured over a long period of time, e.g., minutes, hours, etc. may very well suffer from some rotation if the telescope's polar alignment is not precise (or doubtlessly if an alt-az mount is used instead of an equatorial mount). The method for rotationally aligning images and the issues that arise when both translationally and rotationally aligning images are discussed in detail in the section on planetary processing. Read that section carefully.
It is often useful to help the translational alignment along if the frames are dispersed over a large area by manually nudging them into a very coarse alignment prior to autoaligning. This can be done to an extremely sloppy degree and will help a lot.
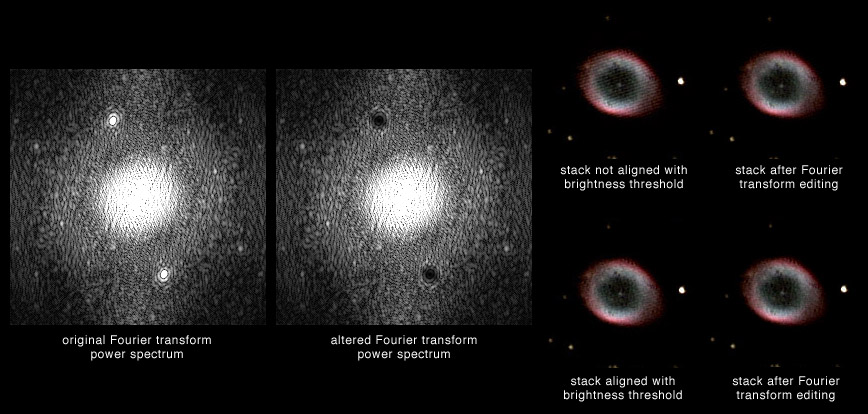
It is also important to be aware that you have the option of setting a brightness threshold for the difference alignment algorithm. You can find this command under the Operations Menu. The menu item is called Set Alignment Brightness Threshold. This command allows you to state that only pixels of a minimum brightness will contribute to the difference calculation and therefore to the alignment procedure. This is particularly useful when the background exhibits artifacts such as faint thin diagonal lines (the infamous herring bone effect). These artifacts would otherwise be enhanced during alignment. This would have the undesirable effects of introducing the artifact into the final stack while simultaneously corrupting the precision of the alignment on the actual object in the image. By thresholding the alignment, the artifact can be minimized or eliminated in addition to obtaining a sharper more precise alignment on the object itself.
Note that in dialog boxes such as the one presented for setting the brightness threshold you can adjust the values with the arrow keys and shift-arrow keys, as well as typing numbers into the boxes.
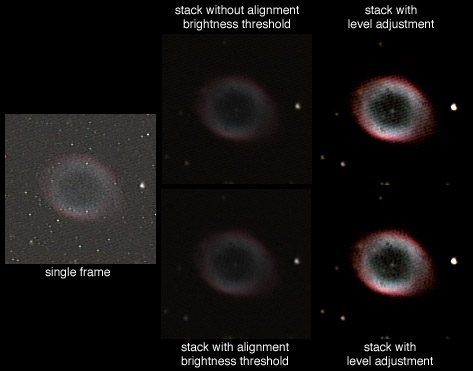
The following image shows an example of the effect of setting an alignment brightness threshold. Also notice that in the final images, the central star of the nova is sharper when using this feature. This occurs because the alignment is more accurately aligning the real information in the frames instead of getting corrupted by the interference pattern.
If you wish to crop the frames, the best time to do it is right after aligning them. The process is described in the section on planetary processing.
The reasons why this might be useful and how to do it are described in the section on planetary processing.
The process by which to sort deep sky images is identical to that for planetary images. However, in practice, you usually have far fewer long exposure images and the bad frames will really stand out. Selecting them and Xing them out should be fairly simply in the case of deep sky image processing, unlike the complicated process necessary for processing planetary images.
Similar to the description for planetary images, you can save and retrieve the state of the workspace at any time. This is useful if you need to stop processing a set of images for a while and are unable to leave the application open continously.
Stacking is performed exactly the same as in planetary processing. However, note that the stack starts out as a pure average of the images. While this is usually what you want in planetary imaging, what you really want in deep sky imaging is usually something more like a sum of the images, which will make the image brighter. This will be taken care of later when you level adjust the stack.
Planetary shots are generally extremely brief exposures, and as such do not exhibit hot pixels. This is not the case for long exposures. You already got rid of the hot pixels by performing dark frame subtraction. However, this can cause problems as well. If the individual frames line up too well, the subtracted hot pixels will cause black holes to appear in the stacked image. Even if alignments drift slightly across the CCD, you can still get faint dark streaks in the stacked image. There are two ways to combat this problem.
The first and preferable way is a command under the Operations Menu called Create Hot Pixel Mask which will let you define a mask that hi-lights the hotpixels while eliminating the rest of the image. Sometimes it is helpful to extend a radius around the hotpixels as well. Creating a hot pixel mask tells the program to not use hot pixel locations in an image at all during the stacking process. If all the frames are perfectly aligned this will result in holes anyway, not because of the hot pixel subtracted holes but because there will be no information at the hot pixel locations to accumulate in the stack. However, if your frames are offset from one another, then the likelihood is that any given location in the stack is represented by at least some individual frames and only the information-containing pixels in each frame will contribute to the stack.
Note that in dialog boxes like this, you can TAB between the fields.
The second way to avoid hot pixel holes is to median filter the individual frames prior to stacking. You can do this by hitting the 'M' key while over a single clip or by making a selection of clips and then hitting the 'M' key. This will bring up a dialog box in which you can specify a median filter radius and a value threshold. Only pixels that are darker than the threshold will be median filtered. All other pixels will remain unaltered. This allows you to fill in the hot pixel holes in the individual frames using nearby pixels as a reference, while leaving nonhot pixels uncorrupted.
The first method is prefereable, if it works. The reason for this is that the first method only accumulates real information in the final stack, information that was truly gathered during imaging in the individual frames. The second method "fakes it" by guessing what the hot pixel holes ought to be filled in with. There is no guarantee that a filled in hot pixel hole will have the true correct value, although hot pixels generally vanish completely using median filtering, which suggests that very good guesses are being made. Such guesses contribute corrupted, although believable, information to the final stack. Nevertheless, the final result is quite impressive. However, the first method is not always satisfactorally effective, since it is dependent on a variety of alignments across the set of individual frames. The second method can be used to supplement or replace the first method in such cases.
The following image shows an example of eliminating hot pixels using a hot pixel mask. The effect would be similar for using median filtering as well. The results speak for themselves.
![]()
The reasons why this might be useful and how to do it are described in the section on planetary processing.
While planetary images usually benefit from a copious amount of sharpening, this is usually unncessary to sharpen deep sky images. However, some deep sky objects have a substantial degree of sharp detail in them, generally nebulas, and some face on spiral galaxies. The process for sharpening is exactly the same as in sharpening planetary images.
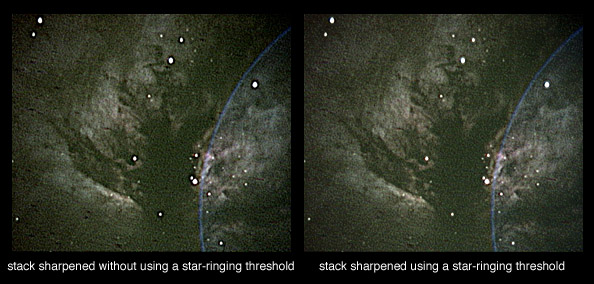
Deep sky images often have stars in them. Sharpening such images using techniques similar to Unsharp Masking and Laplacian Sharpening generaly produce an undesirable artifact in such images in which stars end up being surrounded by dark halos or rings. To understand why this happens, one needs to understand how Unsharp Masking and Laplacian Sharpening work in the first place. Although it takes a lengthy description to fully understand it, it is sufficient to realize that these methods sharpen a blurry edge by making the bright side of the edge brighter and the dark side of the edge darker, which yields dark rings around stars. In order to prevent this effect from happening, there is a textbox in the Interface Dialogs for the sharpening methods which allows you to specify a value cutoff. The default is 0, which means the program will make no effort to prevent "star ringing". Increasing the value in the checkbox increases a cutoff for the sharpening process. Pixels with values greater than or equal to the specified cutoff are sharpened normally, being brightened or darkened as necessary for the sharpening process. Pixels with values below the cutoff are only sharpened if they are to be brightened. If the sharpening process requires such pixels to be darkened they are simply left alone, unsharpened. The edge of the star will still be sharpened because the other side of the edge (inside the star's disk) contains pixels that will be brightened in the usual manner.
The following image shows an example of eliminating star-ringing using a value threshold during sharpening. Notice that there is a secondary benefit of cleaning some residual hot pixel holes that although weak after attempting to eliminate them them, can be strengthened by the sharpening process.
One of the simplest steps is level adjusting the stack. This is performed exactly as in planetary processing. However, note that while the process itself is identical, you will usually adjust the levels differently than you would for planetary images. Since deep sky images are often quite dim, you can brighten them up considerably. Also make good use of the gamma controls to bring out the fainter portions of deep sky objects.
You may want to attempt to remove some of the noise from the final image. This is performed exactly as in planetary processing.
Webcams that have been modified for long exposures are often subject to a variety of forms of electrical interference which can introduce artifacts into the raw images. One common pattern is called the "herring bone" pattern in which a series of fine diagonal lines permeate the entire image. This problem can be dealt with to some degree by using a brightness threshold during image alignment, as described above in the section on aligning the frames. That section has an example which shows the herring bone pattern. Notice that even after properly aligning, the herring bone pattern is still slightly visible, although greatly reduced.
One possible solution is to capture a larger number of images for stacking, which will help smooth and average out the interference pattern, but another method is to directly remove the pattern from the final stacked image. This is readily achieved by use of the Fourier Transform Editor command under the Operations menu.
The following image show the example from above again, this time comparing the final results from above with the results that can be achieved with subsequent Fourier transform editing. The interference pattern is easily identifed in the power spectrum as a matching pair of bright dots. Simply paint them out with the editor and the results speak for themselves. Note that the combination of both brightness threshold alignment and Fourier transform editing is the sharpest (look at the center star and the patterns in the ring). Proper alignment is necessary to get the sharpest alignment of the frames, so don't abuse the Fourier transform editor as a means by which to solve problems like this outright. Instead, use it to patch up the final image.
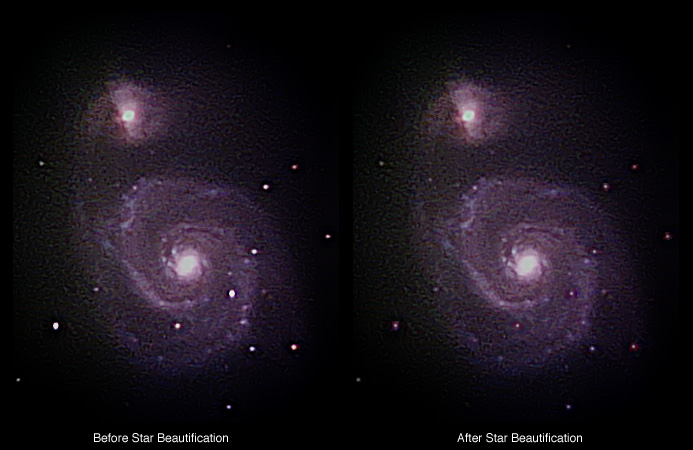
Stars often suffer from two ailments in astrophotos. The first is bloat, in which bright stars expand into a large disks in the raw exposures, when in theory all stars should be a single point regardless of brightness. The second is ringing, which results from various methods of post-processing such as Unsharp-Masking, Laplacian Sharpening, and Wavelet Denoising. Ringing can also occur in raw exposures as a result of quirks in the way CCDs gather light from bright point-sources such as stars. Ringing can be handled at two stages in this program. The first is in the sharpening operations, in which a threshold can be specified which will help alleviate ringing. However, that method is not always entirely effective and similar methods in the Denoising interface don't work very well. Therefore, it is sometimes necessary to perform further deringing using the Star Beautification tool, as well as possible debloating.
The first step is to help the program actually locate the stars. Stars are recognized as contiguous "paint-fills" of bright pixels starting from an arbitrary bright pixel. The first thing to do is to set the star brightness threshold to detect the stars you are interested in. Follow that by adjusting the star spread to fill out most of the area of the stars. By pushing the spread down but leaving the search brightness high, you can more easily avoid picking up nonstars. You can see the detected stars at any given time in two ways. The first is to check the Overlay Star Mask option and the second is to check the Overlay Dering Radius option. Both methods will show the locations of detected stars, but only the Mask method will show the specific pixels that are detected as stars. The Beautification tool will work best if you thoroughly cover the star, so use the Mask to make sure you do this.
As you decrease the star brightness threshold and spread threshold you might start picking up a lot of small dim stars that you don't want to operate on because you are pleased with their present appearance. Use the Minimum Star Surface Area control to eliminate small stars.
Likewise, in pictures with bright elements that are not stars, such as the cores of nebulas and galaxies, the star detection will probably detect these areas as stars as well, which you obviously don't want. There are two ways to combat this problem. The first is to use the Maximum Star Surface Area to eliminate really large detected "stars", which can help rule out nebula and galaxy cores. The second is to drag a rectangle in the thumbnail image to remove areas of the image from any attempts at star detection. Click-dragging without the option key will add areas to the total area to be searched while Click-dragging with the option key will remove areas from the total area to be searched. The default search area is the entire image.
Once you are relatively pleased with the star detection, you can perform either deringing, debloating, or both. Deringing is a simple matter of setting the Dering radius large enough to encompass the worst ringing in the image, and setting the Dering Brightness Threshold to remove the rings.
Debloating is accomplished through truncation of the star outside a specified radius. Simply pick the desired radius and smooth it out some. That's it.
Be aware that the order of operations performs Deringing prior to Debloating, so it is best to pick the settings for these operations in that order as well.
Now that you understand the basics of using this tool, it is useful to understand a few specifics as well. Both the Deringing and Debloating can be finicky and it can be difficult to get really superb results. The first and most important thing to realize is that different stars in different areas of the image might require different degrees of processing. If this is so, do not try to operate on such stars simultaneously. Use the rectangle-dragging trick to eliminate areas of the image and perform Beautifaction in stages by exiting the dialog and opening it again for further processing.
If you discover that your truncated (debloated) stars, have rings around them that are brighter than the surrounding area of the image (easy to detect by using the realtime RGB and HSV readout that is present when the cursor is over the FrameStack window) then you have not set the Star Brightness Threshold or the Star Spread Threshold low enough. This leaves pixels that are brighter than the background outside the star mask which will then be used to approximate the brightness of the truncated area around the star.
Do not be alarmed by the initial appearance of truncated stars before you adjust the Smoothness control. They will look very artificial until you smooth them over a fair degree. The Smoothness control is simply a Gaussian blur that is limited to the bounding rectangle of the star mask instead of the entire image.
Although this tool does not produce truly ideal results, it does quite a nice job of cleaning up stars, as shown in the example below:
You can manually align the red, green, and blue channels of the final FrameStack separately if you with. The method for doing this is described in the section on planetary processing.
That's it. You can save the stacked image and you're done.