To see an example of planetary imaging in action, look at the About Box after launching the program. The following is a list of the necessary steps for processing planetary images. I will go through each one in order, from start to completion:
Keith's Image Stacker supports most common image formats and the Quicktime movie format. To bring separate images or a movie of images into the workspace, simply choose the appropriate menu option under the File menu..
It is important to note that the dimensions of the image will always be equal to the first image brought into the workspace. If you subsequently bring in other images that have other dimensions, they will be squeezed to fit into the present workspace dimensions (which is almost always an unacceptable situation, so don't do it in the first place).
NOTE: You cannot stack images that are greater than 4091 pixels wide. This problem is becoming increasingly prevelant as people use cameras with ever-increasing resolutions. Bottom line, such cameras are much more modern than Image Stacker or its capibilities can handle. You can open larger images into the workspace, operate on images in the workspace, and even save images from the workspace, but you cannot produce a stack greater than 4091 pixels wide. This is a limitation of Apple's Quickdraw PixMap structure and is entirely beyond my control. The only way to fix this would be to rewrite the program using more modern graphics APIs...which I am unlikely to do. The solution is to crop or resample your images before stacking. You can do this either in Image Stacker or in another program before bringing the images into Image Stacker.
When opening individual image files you can select multiple files and bring them all in at once. When opening a Quicktime movie you have several options to help you guide the file-opening process. One of the most important tools at this stage is the ability to crop the movie frames as they are brought in on the fly, rather than cropping them after they have already been brought into the workspace. The advantage of this is that the individual frames never have to take up more memory than their initially cropped size, thereby allowing you to bring in a much larger number of frames. You can specify whether or not the cropping rectangle should align to each frame in the movie as the frames are read. This is a good idea since it prevents cropping of the primary object in the image should the object drift outside your originally specified rect.
There are some other features of the Open Movie Dialog as well. You can choose to only see every Nth frame when you clip on Accept all Remaining where N is a number you can set. By choosing not to see all frames, the opening process will go a little more quickly.
NOTE: The workspace is visibly represented by a window titled Frames. There is no window titled, for example, Workspace. Sorry for any confusion on the matter.
It is crucial that this step be performed prior to resampling, and not after, assuming you intend to resample the frames. Performing these two operations in the opposite order will not work properly at all.
This step is only necessary if the images were captured with a Steve-Chambers RAW-modded webcam that captures the Bayer matrix without deBayering it. If that is the case, you must deBayer the frames before any other processing can seriously be performed. If you have no idea what DeBayering is, or if you have no specific reason to suspect your images are Bayered, you can save yourself a fair amount of headache by skipping this section completely. Bottom line, if you don't what this section is talking about, then you don't need it.
There are four possible Bayer patterns, and only one pattern is right for each frame. However, different frames are likely to require different patterns. The best way to handle this situation is to manually deBayer the reference frame only, by moving the mouse over the first clip and tapping the 'B' key. A dialog will be presented in which you can choose a Bayer pattern and a deBayer algorithm. Trial and error on the four patterns should produce the correct deBayered image. You can then deBayer all the other frames in the working space automatically by selecting all, tapping the 'B' key, and then selecting the option in the deBayer dialog that specifies that the deBayer pattern should automatically be matched to the reference frame.
There are also a number of deBayering algorithms available. They are sorted from top to bottom in order of increasing complexity and required processing time, but also increasing quality of the final result. It is highly recommend that you use the linear interpolation method in all cases. It isn't too much slower than the other methods and will produce much higher quality results.
If you're just starting out with astrophotography or are just trying to figure this program out for the first time, then skip this step entirely.
You may wish to resample the frames prior to stacking. This can be particularly useful if you resample to a larger size since you can then align to a finer resolution than at the original size. If you do this, it is probably a good idea to resample the final stack back to the original size after stacking the frames (which isn't presently supported by this program, you can use any other image-processing program to do that though). To resample the frames simply pick a resampling option from the Resample menu under the Operations menu.
NOTE: I realize that this section is quite long. However, you will be able to edit your images and get them stacked much more easily if you master the interface for aligning frames. Please read this section carefully...then reread it.
NOTE: Assuming you open your images from a Quicktime Movie (as opposed to a set of individual image files), and assuming that you specify a clipping rect in the Open Movie dialog (any rect at all even if it spans the entire raw dimensions of the frame), translational alignment is almost unnecessary as a processing step anymore, because the process of bringing in the clips from the movie file automatically aligns them extremely well. This process uses centroid alignment however, and operates prior to any deBayering that may subsequently be required on the clips. Therefore, you may wish to perform further alignment, but only minor alignment changes should be necessary. In such a case, the '3' key method of alignment will probably be fastest and produce a good final alignment. Furthermore, rotational alignment may still be required.
The first thing you must do besides resampling is align the frames. You must become familiar with the Clips Window and how it works if you are going to quickly navigate and manipulate a large number of clips, so play around with it for a while. Notice that as you move the mouse, the clip under the mouse is always highlighted with a thick yellow border. Also notice that the highlighted frame is always shown in the Frame Inspector Window. Realize, although this is obvious, that you don't have to use the mouse button to highlight a frame. Simply moving the mouse is enough. It is often useful to quickly move the mouse around over the clips to get a sense for the general quality or alignment of the frames.
To align the frames, you must first select a reference frame to which all other frames will be aligned. This should ideally be the highest quality frame in the set, but realistically, any good frame will work. The alignment will suffer if the reference frame is of poor quality so take some time in selecting the reference frame and make careful comparisons between the top comptetitors before moving on to the next step.
When you find a frame you like position the mouse over it and hit the 'R' key. 'R' triggers the Set-Reference-Frame operation and toggles the clip under the mouse with the very first clip in the upper left corner of the Clips Window. Each time you hit 'R' these two clips trade places. The first clip is always referred to as the Reference Frame for the purposes of terminology. Many operations use the reference frame, not just alignment.
It is time to learn another Clips Window command. While moving the mouse around in the Clips Window, pause on a given clip for a moment. As stated above, that clip's frame is shown in the Frame Inspector Window. Now hold down the 'space' key. The Frame Inspector Window instantly changes to show the Reference Frame. As long as the 'space' key is down, the Frame Inspector Window will remain locked to the Reference Frame. When you release 'space' the Frame Inspector Window will revert to its default behavior of showing the clip under the mouse. This is a very useful tool. There are numerous occasions when it is desirable to compare two frames in precise detail. This is the most feasible way to accomplish this goal. For example, say you are searching for a good reference frame to use for alignment. Rather than look at several frames and try to remember how they compare, simply pick one and set it as the Reference Frame. Then go to one of the other potential good frames and flip back and forth quickly with the 'space' key. If the new clip seems better, set it as the Reference Frame. Then continue to explore the clips for another good frame. After doing this a couple times you will have found a very good clip.
Okay, you've picked a good Reference Frame. Now you must select it. Do this by shift-clicking on the Reference Frame. The clip will now appear with a thin yellow border. The reason you must do this is that you need the Reference Frame to be visible in the Frame Inspector Window after you move the mouse outside of the Clips Window. Ordinarily, the Frame Inspector Window is blank when this happens (because there is no way to guess which frame should be displayed). However, if exactly one frame is selected then that frame will be shown persistantly in the Frame Inspector Window except when the mouse is over the Clips Window.
Move to the Frame Inspector Window and click-drag a rectangle around a useful feature. Since this example demonstrates how to work on a planet, the most obvious feature is the bounding rectangle around the planet's perimeter. However, bear in mind that larger Operations Bounds Rectangles (as this rectangle is always called) will require longer periods of time for various operations to complete. In reference to alignment, this rectangle is defining an area which will either be compared by difference with each frame or by centroid location with each frame. In the case of difference alignment, each frame will be aligned to the Reference Frame by finding the translation or rotation that results in the minimum difference between that frame and the Reference Frame within the Operations Bounds Rectangle.
It is time to actually align the frames. Let's do a translational alignment first since this is the more common case (rotation being the alternative). Select all of the frames. Now press and hold down just one of the '1', '2', '3', '4', or '5' keys. While holding down the number key you have chosen, click on any selected clip. Since they are all selected, you can click anywhere in the Clips Windows (except in the lower right corner which will potentially be blank). This usage is common to most operations that act on clips. You perform the operation by clicking on any clip that is presently selected. The operation will then occur on all the selected clips.
Which number should you use? Keys '1', '2', and '3' initiate translational difference alignments. The '1' key should be used for really bad alignments, 15 pixels or more. The '2' key should be used for alignments between 5 and 15 pixels. The '3' key should be used only for very tiny alignments, up to 5 pixels. All three methods will align in all situations. However, each method will perform more quickly than the other two methods within its specified range.
The '4' key initiates translational centroid alignment. If you use this method, you should always follow it with a minor difference alignment with the '3' key, since it is not as precise as the difference alignments. However, the centroid alignment is generally faster than the difference alignments when the alignment error is large and is therefore recommended as a first-pass approach to translational alignment.
The '5' key initiates translational cross-correlation alignment which is calculated using the Fourier Transform of the frame. Although highly toted in the literature, it has some drawbacks. It performs more slowly than centroid alignment, but probably more precisely than centroid alignment. It is unclear whether it runs faster or slower than difference alignment and whether it performs better than difference alignment. Finally, it can get thoroughly confused sometimes, which can result in completely incorrect results.
It is also worth noting that you can choose whether or not to translationally align the red, green, and blue channels separately. The "difference" method of aligning frames aligns, as one would expect, by matching the difference between the frame being aligned and the Reference Frame. The default behavior is for this difference to be calculated using the average value of a given pixel's red, green, and blue components in the two images. By selecting the Align RGB Channels Separately menu option under the Operations Menu, you can align the red, green, and blue channels of an image separately, so that rather than having one translation for the image, you have three. This can be particularly useful for objects imaged low on the horizon where the atmosphere often distorts the blue channel out of sync with the red channel.
In order to align the RGB channels separately you simply check the corresponding menu item and then align in a normal fashion by holding down the '1', '2', or '3' key to specify an auto-alignment search size and clicking on a clip.
Rotational alignment works in a similar fashion to the difference-based methods initiated by '1', '2', or '3'. To perform a rotational alignment hold down one of the '6', '7', or '8' keys. Where as for translational alignment larger translational errors are more efficiently aligned with the '1' key, likewise for rotational alignment, larger rotational errors are more efficiently aligned with the '6' key. The '6' is most efficient for rotations that are off by more than four degrees, the '7' is most efficient in the two to four degree range, and the '8' key is most efficient below two degrees.
NOTE: You can manually nudge any clip's rotation or translation. While no clips are selected move the mouse over a single clip, or alternatively make a selection of clips by shift-clicking or shift-click-dragging over the clips in the Clips Window. Now use the arrows keys to nudge the frame's translation or the entire selection of frames. By holding down shift, option, and/or control while using the arrow keys you can cause larger nudges. Each of the three shift/option/control keys is equivalent in this usage. The trick is that the more of these three keys you hold down, the larger a nudge you get, so you have four possible nudge sizes, none of the shift/option/control keys, one of them, two of them, or all three. To manually nudge rotation, use 'z', 'x' to rotate by .36 degrees, and 'Z', and 'X' to rotate by 3.6 degrees.
It is often helpful to manually nudge frames a little bit before autoaligning. This is especially useful if, after autoaligning, you realize the autoalignment made mistakes with some of the frames in the selection. In such a case, manually nudge the frames into a fast and loose alignment and then throw the autoalignment at them to get a precise alignment.
Also be aware that you can manually nudge the red, green, and blue channels separately. This is similar to performing autoalignment on the three channels separately. To manually nudge the channels separately, start by checking the Align RGB Channels Separately menu option under the Operations Menu. Then, while holding down the '1', '2', or '3' key, tap or hold down an arrow key (be aware that this won't work in larger nudges with the shift, option, or control keys. You must nudge separate channels in single pixel increments by only holding down a number key). Only one channel will be nudged, corresponding to the numerical key being held down, '1' for red, '2' for green, or '3' for blue. This can be quite confusing since the same number keys can specify two entirely different things depending on the situation. When clicking with the mouse they specify auto-alignment search sizes. When using the arrow keys they specify a single channel. Sorry about this. I am working on a new interface for a future version that will alleviate this problem.
The last thing that needs to be commented on is the difficulty of performing both translational and rotational alignment on a single frame. This is an inherently difficult task. The best approach is to go back and forth between the two, first translationally aligning and then rotationally aligning. In many cases the auto-alignment process will seem to get stuck, meaning that autoalignment locks into an alignment that it can't escape from (it believes is ideal) even though you can easily tell (with the 'space' key) that the alignment is suboptimal. This occurs because of the conflict between translation and rotation. In such a case, translation has locked such that it cannot find a better translation without first rotating, but rotation suffers the same problem in with respect to translation. The solution is to manually nudge the rotational alignment and then resume auto-aligning starting with translational alignment again. There are more intelligent algorithms that could do a better job of this but I have not had a chance to design or implement them yet. Sorry.
You may wish to crop the frames after they have been aligned. This is never a requirement, but it can free up more of the computer's memory so that subsequent operations go faster. To crop, select exactly one frame (I always select the reference frame for this kind of work). Then move to the Frame Inspector Window and click/drag a rectangle. Then simply pick the Crop menu command under the Operations menu.
Sometimes the frames will vary in brightness. One common cause of this is having thin cloudcover blow across the planet while imaging. Some of the sorting methods will benefit from normalizing the frames prior to sorting. Normalization makes all the images the same brightness. Normalization requires an Operations Bounds Rectangle, so first select one frame, move to the Frame Inspector Window, and click/drag a rectangle around a feature such as a planet or a moon. Then, to normalize an individual frame, deselect all, and hit the 'N' key while the mouse is over that frame's clip. To normalize several frames, make a selection by shift-click/dragging over the clips and then hit the 'N' key.
There are two ways to normalize. You can normalize the brightest pixel in the Operations Bounds Rect or the average brightness within the Operation Bounds Rectangle. The second method works better but make sure you don't saturate the frames or you will be throwing away useful information.
It is rarely advantageous to stack the entire set of frames. Instead, you usually want to select the good frames, and exclude the bad frames. Exactly what it means for a frame to be good or bad can be a little difficult to specify. Therefore, there are numerous possible methods by which to sort and include/exclude frames from the stack.
The simplest and usually the most accurate method is "manual frame selection", whereby you personally inspect each frame and rule it accepted or rejected. To do this, start passing the mouse over the Clips Window. All frames are included in the stack by default. To reject a particular frame, click on it with the mouse. It will be Xed out in red in the Clips Window and a small red X will appear in the Frame Inspector Window whenever that frame is shown in the Frame Inspector Window. With a little practice you can move through a large number of frames rather quickly.
A hint about manual frame selection: You should have already selected a good frame for the reference frame since you did this to align. Therefore, it is easy to compare the rest of the frames to the reference frame by using the space-bar command mentioned above. As you inspect the frames toggle back and forth quickly to the reference frame to visually appreciate the difference between the reference frame and the frame you are inspecting at any given moment. This will give you a better indication as to whether to include the frame.
Sometimes you have hundreds of frames and it will simply take too much effort to manually inspect all the frames. In that case, it is best to sort the frames by some measure of quality and then only include some fraction of the frames at the beginning or end of the list. Each of the sorting methods requires that an Operations Bounds Rectangle be defined. Select only one frame (I usually use the reference frame), move to the Frame Inspector Window, and click/drag a rectangle around the feature you want to use for sorting.
Each sorting method works best on a specific kind of feature. Details about this are provided below. Be aware that some sorting methods require a rectangle that is an exact power of 2. To get such a rectangle, pick the size of the rectangle from the Power^2 Dimensions menu under the Operations menu and then control/click/drag in the Frame Inspector Window. If the dimensions of the image are too small for a particular power^2 rectangle, no rectangle will be visible in the Frame Inspector Window.
After an Operations Bounds Rectangle has been defined, pick the sorting method you want from the Sort menu under the Operations menu. Some of the sorting methods will instantly sort the frames when you do this. Others will bring up a dialog box where you can control how the frames are sorted and which fraction of the frames are automatically included in the stack.
At any point in time you may save the entire workspace, which consists of all the frames and all of their attributes (alignment, dark-frame subtraction, etc), and the dark frame and flat field frame if they are present. Saving the workspace does not save any work performed on a stack, such as sharpening or level adjustment however. In fact, saving the workspace completely discards the stack if you have generated one already.
To save the workspace at any time, simply choose the appropriate menu item under the File menu. First, a dialog box will be presented to you telling you how much disk space will be required to save the workspace. You may cancel at this time if you realize you don't have enough disk space. Otherwise, you can choose whether or not to attempt lossless compression and whether or not to save nonstack-included frames (red X) and then may proceed to save the workspace file.
The lossless compression scheme is a little unpredictable. Sometimes it will actually produce a workspace file that is larger than you would otherwise get if you don't attempt to compress the data at all. Fortunately, the dialog box shows you how large the file will be in both cases so you can choose the smaller one. Alternatively, you may opt for the uncompressed method because it is generally a slight bit faster to save and open even if it takes up more space on the harddrive.
Likewise, you can open a workspace file at any point in time. Doing so will completely discard any present workspace, so make sure this is what you really want to do.
After you have sorted or otherwise included and excluded frames from the stack it is time to actually produce a stack of the frames that are to be included in the stack. To stack the included frames, simply choose the Sum/Stack all included Frames command from the Operations menu. It is important to understand how the SumStack works in order to properly manipulate level adjustment controls later on. Each individual frame is 8 bits deep per red, green, and blue channel. This is not the case for the SumStack which is 32 bits deep per channel. This means you can theoretically stack 2 to the 24th frames before saturating the available dynamic range.
The stack that is produced will always be a pure average of the images. This is what you usually want in the case of planetary processing.
NOTE: Please see the note above in the section Bringing the raw frames into the workspace about the 4091 maximum image width limitation on stacks.
This is usually unncessary, but sometimes the stack will have patterned defects in it, such as thin parallel lines. A small amount of blurring can occasionally fix these kinds of problems up. Simply choose the appropriate command under the Operations menu.
It is important to sharpen an image before level adjusting it and not vs/va. Sharpening adds information to the original image, making parts of it brighter. If you were to adjust the levels first, bringing up the brightness of the image in any way at all, you would limit the degree to which you could subsequently sharpen the image before you hit the saturation limit, so always sharpen first, and then adjust the levels.
There are two sharpening methods, Unsharp Masking and Laplacian Sharpening. I am not going to explain how they work in a deep way here. Instead I simply provide a quick description.
You can specify the radius of blur and the intensity of the mask. The radius determines at what scale you sharpen the image, smaller radii specify fine details. The mask intensity determines how strongly the image is sharpened at the scale specfied by the radius.
Laplacian Sharpening takes some practice. When you select this method the first thing that will happen is that six different masks will be generated by blurring the image at six different radii. You will then get the Laplacian Sharpening dialog in which you can adjust the mask intensities at each level individually. The masks correspond to different frequency components of the image. The sliders for the mask intensities are sorted from top to bottom in order of decreasing frequency, so the sliders at the top control masks corresponding to high frequencies (fine details), and the sliders at the bottom control masks corresponding to low frequencies (large patterns in the image).
There are checkboxes next to each slider that can be used to pin the slider to the value 0 or 1 when selected. The checkbox for 1 is useful to toggable back and forth to get a feel for what effect a particular slider is having on the image. The checkbox for 0 is useful for completely removing a particular mask's information from the resulting image, say to remove a noisy mask.
One of the simplest steps is level adjustment. Choose the Show Histograms/Alter Levels command under the Operations menu. A dialog box will appear which allow you to alter low and high cutoffs and gamma for each channel. Note that by click/dragging in the small thumbnail image inside the dialog box you can define what area used for calculating the histograms that are shown. Since this rectangle effects the histograms and the histograms are used by the Auto Levels button, this rectangle also has an effect on how the Auto Levels button operates.
You may want to attempt to remove some of the noise from the final image. This can be done with the Wavelet/Shrinkage Denoise command under the Operations menu. The dialog box will let you specify a preview area and a set of wavelet coefficient thresholds for wavelet shrinkage using a steerable pyramid with four oriented filters. Don't worry about what that means too much. Just select a preview area that bounds an interesting part of the image and set thresholds that you feel best reduce the noise without damaging the image too much. Much like the Laplacian Sharpening Interface, the sliders nearer the top of the window adjust high frequencies and the sliders nearer the bottom adjust low frequencies. When you click Okay, the thresholds chosen will be applied to the entire image.
Also note that as you change the shape and size of the preview area the cost of generating preview is displayed in the dialog. As the preview area becomes larger, lower frequency sliders will be enabled. All of the sliders' corresponding thresholds will be applied to the image with the OK button is pressed, but only those which are enabled will have an effect on the preview. In addition, if a preview can be generated in under a half second, live previewing will be enabled, such that the preview is updated on the fly as a theshold slider is dragged or as a threshld slider is adjusted with the arrow keys.
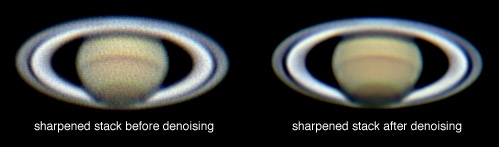
Incidently, wavelet shrinkage denoising tends to reduce the constrast of an image, so you may want to increase the constrast after performing this operation.
The following image demonstrates the powerful effect of wavelet shrinkage denoising.
This step is almost never required in planetary imaging, but you should realize that it is available if you need it. Further description is offered in the instructions for deep sky processing.
You can manually align the red, green, and blue channels of the final stack if you wish. This can be useful if the channels are out of alignment, which often occurs when imaging objects low on the horizon, where the atmosphere distorts the blue channel. Make sure the FrameStack window is in the foreground. Then, while holding down the '1', '2', or '3' keys, tap or hold down an arrow key. Each number key corresponds to the red, green, or blue channel obviously.
That's it. The stack is complete. You can save the stacked image now and you're done.