Brick Pizza Oven Construction Timeline
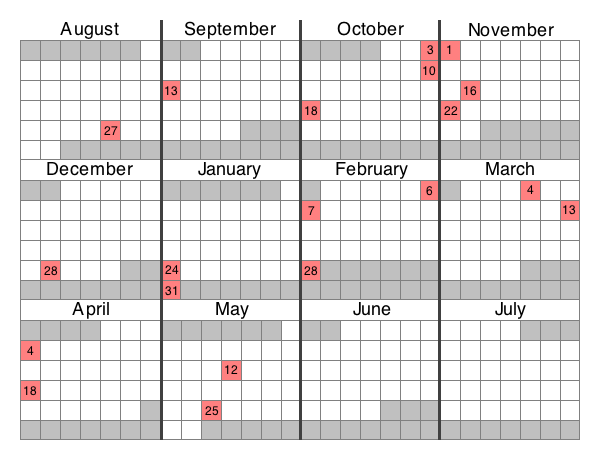
Brief Timeline, Major Milestones
- 8/27/09: Saw a Gizmodo article about Forno Bravo*. Downloaded the Forno Bravo Pompeii Oven plans.
- 9/13/09: Broke ground. Started digging the foundation pit.
- 10/3/09: Poured the foundation.
- 10/10/09: Filled the vertical wall cores.
- 10/18/09: Poured the hearth.
- 11/1/09: Finished laying the InsBlock 19 out. Laid out the floor bricks.
- 11/16/09: Finished the inner arch.
- 11/22/09: Finished the first tilted course. Finished the outer arch.
- 12/28/09: Placed the keystone, thus finishing the dome (4 months from start).
- 1/24/10: Finished the vent.
- 1/31/10: Built the chimney shoe.
- 2/6/10: Installed the InsWool HP Bulk insulation.
- 2/7/10: Lit the first curing fire.
- 2/28/10: Cooked the inaugural pizzas (6 months from start).
- 3/4/10: Finished the door.
- 3/13/10: Finished filling the terraces.
- 4/4/10: Finished building the planter walls.
- 4/18/10: Poured the counter.
- 5/12/10: Finished the third (and final) stucco coat (minus some touching up) (8.5 months from start).
- 5/25/10: Finished planting the planter beds.
- 5/16/11: (~1 year after planter beds) Finished backfilling behind the oven and stuccoing the stand (20.5 months from start).
* After surfing from the Gizmodo article to the Forno Bravo site, I actually recognized it as a site that I had seen at some point in the past year while doing some cursory brick oven research once or twice. Nothing ever came of these previous forays until I rediscovered Forno Bravo via the Gizmodo article however. After that, this project quickly kicked into high gear.
Detailed Timeline
August 2009
 |
|
|
|
|
|
|
|
|
|
|
|
|
1 |
| 2 |
3 |
4 |
5 |
6 |
7 |
8 |
| 9 |
10 |
11 |
12 |
13 |
14 |
15 |
| 16 |
17 |
18 |
19 |
20 |
21 |
22 |
| 23 |
24 |
25 |
26 |
27
Saw a Gizmodo article about Forno Bravo*. Downloaded the Forno Bravo Pompeii Oven plans.
|
28 |
29 |
| 30 |
31 |
|
|
|
|
|
* After surfing from the Gizmodo article to the Forno Bravo site, I actually recognized it as a site that I had seen at some point in the past year while doing some cursory brick oven research once or twice. Nothing ever came of these previous forays until I rediscovered Forno Bravo via the Gizmodo article however. After that, this project quickly kicked into high gear.
September 2009
|
|
|
|
|
|
|
|
|
1
Spent a few weeks designing the dome, sourcing/pricing materials, studying the plans, basically procrastinating out of fear.
|
2 |
3 |
4 |
5 |
| 6 |
7 |
8 |
9 |
10 |
11 |
12
First money spent: a load of concrete blocks and a square transfer shovel.
|
13
Broke ground! Started digging the foundation pit.
|
14
I was purchasing tools and materials every day between the 12th and the 23rd.
|
15
Finished digging the basic pit, much refinement to come.
|
16
Bought the Harbor Freight tile/brick saw. That was a commitment.
|
17
First gravel dump.
|
18
17th, 18th, & 21st: Pipe-bent 13x1/2"x20' rebar in the Home Depot parking lot to fit them on my car, then cut them at home (with an angle grinder).
|
19
Most of the gravel placed, concrete block footprint laid out to verify foundation area.
|
20
Cut the foundation form 2x6s.
|
21
21st and 23rd: Four trips to Home Depot, loading/unloading 50x60lbs of concrete in the process. Awesome sale, which ended before I got all my concrete. Sigh.
|
22
While purchasing materials during this time, I was also cutting up the rebar.
|
23 |
24 |
25 |
26 |
| 27 |
28
|
29
Bought 50lbs of InsWool HP Bulk. Also obtained a huge quantity of free leftover vermiculite.
|
30
Nailed the foundation form together, including masonite in two curved sections. Added more gravel. Obtained my neighbor's concrete mixer.
|
|
|
|
October 2009
|
|
|
|
|
|
|
|
|
|
|
1
Finished cutting the rebar for the foundation. Still need to bend it to fit the form.
|
2 |
3
Poured the foundation, 5x80lbs + 29x60lbs Sakrete, about 20lbs discarded. THANKS A MILLION ANGIE, KEVIN AND TOM!
|
4
For the next week I zealously misted the foundation and kept it covered with plastic since I almost certainly mixed it too dry.
|
5
Bought 250 fire bricks (one trip caravaning Tom's Tacoma and my Forester). Tom also helped unload the bricks. Swell! Finally, finished cutting all the rebar.
|
6 |
7
Dry-stacked the concrete blocks on the foundation. Discovered the foundation is not perfectly flat (much less level). Not too worried though.
|
8 |
9 |
10
Arranged the hearth rebar and filled the vertical wall cores, 4x80lbs + 9.5x60lbs Sakrete. Thanks again Kevin and Tom.
|
| 11 |
12
Spent this week building the hearth slab form and buying more supplies.
|
13 |
14 |
15 |
16 |
17
Desperately wanted to pour the hearth, but rain prevented it...so I spent all day amending and appending the rain awning.
|
18
Poured the hearth, 7.5x80lbs + 11.5x60lbs Sakrete. Angie and I did this alone. It was pretty arduous. Mixed it too dry again, dammit!
|
19
Spent this week building the tile-saw stand and cleaning up the basement.
|
20 |
21 |
22 |
23 |
24 |
25
Took the forms off the hearth and finished the tile-saw stand.
|
26 |
27 |
28 |
29
Built a plastic room in the corner of the basement to confine the tile-saw's mess.
|
30 |
31
Cut the 1" InsBlock 19 for three layers of hearth insulation and started laying it out on the hearth.
|
November 2009
|
|
|
|
|
|
|
1
Finished laying the InsBlock 19 out. Laid out the floor bricks and cut most of the floor bricks.
|
2
I spent this week cutting bricks and getting final supplies.
|
3 |
4 |
5
Awning was destroyed in a thunderstorm. Multiple layers of tarps wrapped over the hearth would hopefully protect the InsBlock 19 from disintegrating. Hail followed later the same night.
|
6
Started building a new awning from scratch.
|
7
Finished awning, cut plywood floor to protect floor bricks during dome build. Mortared pairs of first-course bricks together, but nothing mortared on site.
|
8
Mortared the first two courses and some of the third course in place.
|
9
Parged a very small section of the foundation to see if I had a clue how to do it.
|
10 |
11
Parged one side of the hearth, still figuring this out. Finished mortaring the first-course-entryway merge. Finished building the entry arch form. Mortared all but one brick of the innermost arch. Mortared more of the third course.
|
12 |
13
It went below 32 at night this weekend, which would have damaged the mortar, so I left a halogen worklight under the tarp all night. Upper 70s on the inside, 50s on the outside. Phew!
|
14
Almost finished the inner arch. Added wall-to-dome wedges. Finished the brick-placement tool.
|
15
Finished the inner arch, except the need to fill some crevices with additional mortar. Finished cutting bricks for the outer arch.
|
16
Finished the inner arch.
|
17
Spent this week cutting bricks for the first tilted course and mortaring pieces of the outer arch together for transport to the site.
|
18 |
19 |
20 |
21
Built the first tilted course of the dome using the brick placement tool.
|
22
Cut and mortared arch merges for the first tilted course. Finished the outer arch.
|
23 |
24 |
25
Completed the second tilted course.
|
26
Completed the third tilted course.
|
27 |
28 |
| 29 |
30 |
|
|
|
|
|
December 2009
|
|
|
|
|
|
|
|
|
1 |
2 |
3 |
4
Fourth course done except arch merges.
|
5
Was forced to slow way down by a severe cold snap.
|
6
Spent the cold weather cutting bricks for the fourth arch merge and the fifth course.
|
7 |
8 |
9 |
10 |
11 |
12 |
13
Temporary scare. Broke the tile saw. Turned out to be a seventy-cent fix.
|
14
Fixed the tile saw.
|
15 |
16
First mortar work since 12/5. Placed the fourth course arch merges and four fifth course bricks.
|
17 |
18 |
19
Finished the fifth course except for a partial wedge to fill in the closure gap (but it's cut, ready to go). Cut all the sixth course bricks. Finally wore out the first saw blade.
|
| 20 |
21
Finished the sixth course except for a partial wedge to fill in the closure gap.
|
22 |
23 |
24
Finished the seventh course except for a partial wedge to fill in the closure gap.
|
25 |
26 |
27
Finished the eighth course except for a partial wedge to fill in the closure gap.
|
28
Finished the eighth course. Placed the keystone, thus finishing the dome!!! Broke the entry arch by hitting it with my head as I entered the oven to clean the mortar. Sigh.
|
29 |
30
Cleaned up the mortar, did a little rebuilding on the entry arch.
|
31
Left for vacation
|
|
|
January 2010
|
|
|
|
|
|
|
|
|
|
|
|
1 |
2 |
| 3 |
4 |
5 |
6 |
7
Returned from vacation
|
8 |
9 |
| 10 |
11
Spent much of this week cutting bricks for the vent.
|
12 |
13 |
14 |
15
A little progress on rebuilding the broken entry arch.
|
16 |
17
Finished rebuilding the broken entry arch.
|
18 |
19 |
20
Started mortaring the vent bricks.
|
21 |
22 |
23 |
24
Finished vent construction.
|
25
Spent this week building the InsWool HP Bulk cage and cutting the chimney shoe bricks.
|
26 |
27 |
28 |
29 |
30 |
31
Built the chimney shoe.
|
|
|
|
|
|
|
February 2010
|
|
|
|
|
|
|
|
1 |
2 |
3 |
4
Bought 1/2 cord green maple, 1/2 cord dry fir.
|
5
Dismantled the suspended tarp in prep for curing fires. Pretty big step.
|
6
Installed the InsWool HP Bulk insulation.
|
7
Lit the first curing fire (Goal: 100F at dome apex).
|
8
Spent this week framing the first terrace with hardibacker.
|
9 |
10 |
11 |
12 |
13 |
14
Filled the first terrace vermicrete and lit the second curing fire (two 100Fs on sides of oven).
|
15
Lit the third (200F) and fourth curing fires (morning/evening).
|
16
Lit the fifth curing fire (300F).
|
17
Lit the sixth curing fire (400F). First fire with full-size firewood.
|
18
Designing a door this week, measuring the second terrace forms.
|
19
Lit the seventh curing fire (500F).
|
20
Lit the eighth curing fire (600F).
|
21
Filled the second terrace vermiperlcrete and lit the ninth curing fire (750F, spiked to 800F).
|
22 |
23 |
24 |
25
Began construction of the door.
|
26 |
27 |
28
Framed the third terrace. Fired the oven for the first pizzas (over 1000F, much lower for cooking). Cooked the inaugural pizzas.
|
|
|
|
|
|
|
March 2010
|
|
|
|
|
|
|
|
1 |
2 |
3 |
4
Finished construction of the door.
|
5 |
6 |
7
Second pizza attempt didnt go too well.
|
8 |
9
Third pizza attempt, success.
|
10 |
11 |
12 |
13
Filled the third terrace vermiperlcrete.
|
| 14 |
15 |
16 |
17 |
18 |
19
Parged the lower two terraces.
|
20 |
21
Parged the upper terrace.
|
22 |
23 |
24 |
25 |
26 |
27
Started building the planter walls.
|
| 28 |
29
Spent this week building the planter walls and cutting forms to pour the countertop.
|
30 |
31 |
|
|
|
April 2010
|
|
|
|
|
|
|
|
|
|
|
1 |
2 |
3 |
4
Finished building the planter walls. Fourth pizza cooking, first bread from-scratch.
|
5 |
6 |
7 |
8 |
9 |
10
Filled the extended counter support wall cores.
|
11
Spent this week building the counter form.
|
12 |
13 |
14 |
15 |
16 |
17 |
18
Poured the counter, 8x80lbs Sakrete.
|
19 |
20 |
21 |
22 |
23 |
24
Took forms off the counter. Started stuccoing the oven.
|
25
Glued most of the tiles on, except the east side. Party for six people, four pizzas, numbers 9-12.
|
26 |
27 |
28
Finished gluing the tiles on.
|
29 |
30 |
|
May 2010
|
|
|
|
|
|
|
|
|
|
|
|
|
1 |
2
Finished the first stucco coat.
|
3 |
4 |
5 |
6 |
7 |
8
Finished the second stucco coat.
|
| 9 |
10 |
11 |
12
Finished the third (and final) stucco coat (minus some touching up).
|
13 |
14 |
15 |
16
Sixth pizza night (margherita, pepperoni) plus french bread.
|
17 |
18 |
19 |
20 |
21
Seventh pizza night: pepperoni/kalamata, tiramisu-mascarpone/ chocolate/ strawberries.
|
22 |
23
Filled the planter beds with soil, almost finished planting the planter beds.
|
24 |
25
Finished planting the planter beds.
|
26 |
27 |
28 |
29 |
| 30 |
31 |
|
|
|
|
|
June 2010
No notable events
July 2010
31st: Biggest pizza party yet, seven pizzas (twelve doughballs prepped, but there were no-shows).
August 2010
23rd: First roasted chicken, Thanksgiving practice.
...Sep, Oct, Nov, Dec 2010, Jan, Feb, Mar, Apr 2011...
May 2011
16th: (about a year after finishing and planting the planter beds) Finished backfilling behind the oven and stuccoing the stand.
August 2012
5th: Anchored a pole in concrete behind the oven to support an eventual 11' stove-pipe to replace the current 4' stove-pipe.
