IntroductionI used to play a mean game of chess, but alas, I haven't played much in a long time. More recently, I have developed a mild, non-addiction quality, interest in a few Eurogames, namely, Settlers of Catan (in all its forms), Carcassonne (I prefer the Hunters and Gatherers variant), and to a lesser extent Tikal and Tigris & Euphrates (the last of which I don't even own, but thoroughly enjoyed playing once). My interest in games led me to try to design a few. One such game has been fully developed and prototyped. I describe it below. 
Beams, Boosters, and BarriersCopyright DisclaimerBeams, Boosters, and Barriers is a board game I invented. I describe it in full detail here and even include a downloadable printable manual and downloadable printable board sections. However, I retain full copyright priviledges on it. If you know of anyone who is selling this game for profit please notify me. Alternatively, if you are a professional board game publisher and would like to work with me on publishing this game, then by all means, please contact me a.s.a.p. Thank you. The following is a verbatim duplicate of the instruction manual, which can be downloaded as a nicely formatted, double-sided, folding pdf at the bottom of the page. IntroductionBeams, Boosters, and Barriers is an abstract strategy board game for two players. Each player places and orients distinctly marked pieces in his territory. Each player's goal is to aim his beams across the rear boundary of his opponent's territory while simultaneously blocking his opponents beams. The BoardThe board is a hexagonal grid divided into two territories. The midline of the board, indicated by a row of dark hexagonal cells, separates the two territories. Distinct colored rays indicate diagonal paths across the board and should assist players in following diagonal beams. Letters and numbers uniquely label the coordinate of each location and are used in more advanced methods of play. 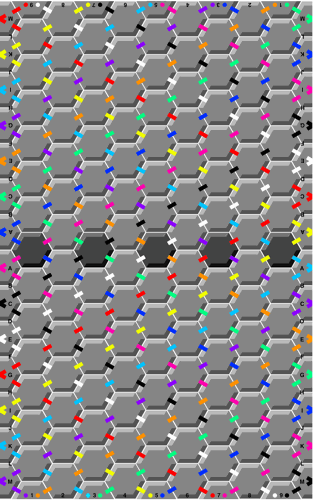
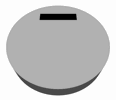
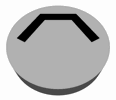
The border contains alphabetic and numerical labels that uniquely designate the cells in a territory. For example, cell B1 is directly behind the furthest left neutral cell while cell A2 is behind and between the two furthest left neutral cells. These labels are only used in more advanced methods of play. The board contains colored rays which uniquely indicate diagonal paths across the board. Beams reflect off the side boundaries but exit the board at the rear boundaries. The rays are provided merely to assist the players in following a diagonal beam along its path across the board. The PiecesThere are three kinds of pieces: beam-generators, barriers, and boosters. Beam-generators have red lines, barriers have black lines, and boosters have no markings. When a beam-generator is placed in a specific location with a specific orientation, it initiates between one and three beams from its position, each of which follows a path across the board. Diagonal beams reflect off the side walls. However, all beams exit the board at the territorial rear boundaries.
A barrier provides resistance to any beam crossing it. Note that barriers resist beams generated by both players. Therefore, it is important that players not block their own beams. Beam-generators and barriers have an initial power of one. Wherever a beam crosses a barrier, the beam's power is reduced by the barrier's resistance to as low as zero (a beam that has been successfully stopped). 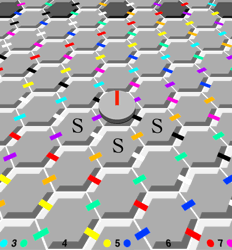
Boosters boost the power of beam-generators and barriers when they are placed in specific nearby cells. Of the six cells adjacent to a given cell, only the three cells in the rear can provide a power boost with the placement of a booster (those cells marked with an 'S' in the figure shown at right). A single booster provides a power boost of one. Therefore, a beam-generator or barrier affected by a single booster has a power of two. With two boosters the power is three and with three boosters the power is four. Legal MovesThere are two kinds of moves in the game: placements and rotations. On a player's turn, he may choose to either place one of his currently unplaced pieces or rotate an already-placed piece by sixty degrees (one "notch"). Neither player may play on the dark cells on the midline as they are neutral territory. In addition, players may not play on the partial cells on the side and rear boundaries. Finally, beam-generators may not be placed adjacent to one another, although barriers and boosters may. When a placement results in a boosted beam-generator or barrier, players should place a dotted counter on top of the affected pieces to indicate their current power (see figure below). If a player performed a rotation on the previous turn, he must perform a placement on the current turn. The one exception to this rule is when one player has placed all of his pieces but the other player has not. The player who still has unplaced pieces must continue to place pieces at least every other turn. The player who has placed all his pieces is, however, permitted to perform rotations on every remaining turn until the game is over. 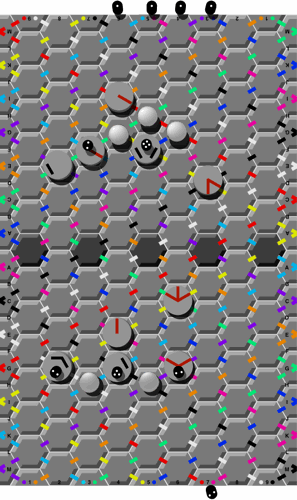
Ending the GameAfter the turn on which the last piece is played, there follows one more turn of rotations by both players. The game then ends and the final score is determined by the current state of the incident beams and their counters at each rear boundary. Note that a tie-game is entirely likely. When a beam-generator or barrier is boosted, a dotted counter should be placed on top of the boosted piece to indicate its current power, as shown above. Likewise, counters should also be placed behind the rear boundary of each territory to keep track of incident beams and to display the current midgame score. While it may appear confusing to determine a midgame score from scratch, it is considerably easier to merely update the midgame score after a single move has occurred. If the players do lose track of the midgame score, simply wipe away the counters behind the territories and reevaluate the incident beams one at a time in a cumulative fashion. ScoringAny beam that crosses the rear boundary of the opponent's territory with a power of at least one is worth one point. Beams with higher power are not worth more points. After a move is made, players should determine how the move affects incoming and outgoing beams at both rear boundaries. Dotted counters should be placed behind the rear boundaries of the territories to keep track of the number of beams that currently exit the territories at each location. The player with the most points at the end of the game wins. Methods of PlayThere are two very different ways of playing Beams, Boosters and Barriers: synchronous, and asynchronous. Synchronous play is simpler to understand and to perform. Synchronous play requires the players to determine who will go first by flipping a coin. Players then alternate turns, making moves one at a time, as described above, until the game ends. Asynchronous play consists of both players choosing a move for each turn and then making their respective moves simultaneously. This is the fairer way to play and is therefore the intended way to play, but due to its complexity, the synchronous method might be preferred by beginners. To perform an asynchronous turn, both players decide on their move and then notate it on paper secretly using the notation described below. When both players have made their decision, they then make their chosen move. The purpose of notating the chosen move before moving is to restrict a player to the move he chose and to prevent him from changing his mind as he sees his opponent reaching for a piece. The notation is as follows:
Recommended for BeginnersIt is recommended that beginners, in addition to playing synchronously, also simplify the game by removing the triple beam and triple barrier pieces from the game. Note that it is possible to lose track of the scoring at midgame when attempting to update the affects of a move. If this happens, remove all counters from behind the territory and reevaluate the incident beams from scratch, one at a time, in a cumulative fashion. CreditsBeams, Boosters, and Barriers was conceived of and designed by Keith Wiley © 2007. http://keithwiley.com
DownloadDownload the manual and board components This package provided above contains the manual, the board, and the pieces. The manual is specially formatted to produce a booklet when printed properly. The board is broken up into four quadrants that fit together. If the pieces file is printed with no image scaling, it will produce beam generators and barriers the size of a quarter, boosters the size of a nickel, and counters the size of a dime. You can make pieces by glue or taping the printouts to the appropriate coins (alternatively, you might consider printing the pieces on a sticker sheet). The included README contains more information about printing the documents. |
|||||||||||||||||||||